
Friday, August 27, 2010
A Versatile Temperature Data Logger using PIC12F683 and DS1820
PIC12F683 is just a 8-pin microcontroller, but it is enough to log 254 temperature readings from DS1820 sensor in its inteernal EEPROM. Here's a tiny temperature data logger built with a PIC12F683 and DS1820. It has Start, Stop, and Send switch buttons for controlling various operations. The sampling interval is selectable to 1 sec, 1 min, or 10 min. The logged values can be sent to a PC through serial port.

Thursday, August 26, 2010
AT89S52 Development Board
If you are looking for a simple AT89S52 experimental board, you don't have to go far. You can build one by yourself. This board has two channel 12-bit ADC, a 4-digit seven segment LED , a LCD connector, four tact switches, and the ISP loader to load the firmware.

Monday, August 23, 2010
DIY: A 3-Digit Digital Voltmeter (Atmega8)
Here's a simple digital voltmeter based on Atmega8 microcontroller. It uses the in-built A/D converter to measure the input analog voltage and displays it on a 3-digit seven segment LED display.
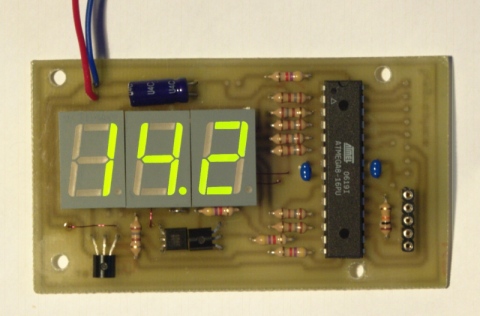
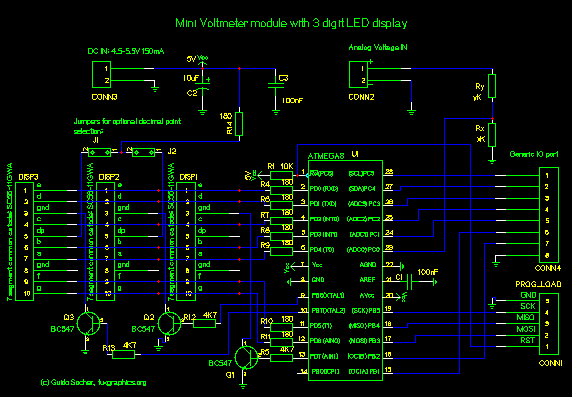
Source: http://tuxgraphics.org/electronics/200706/mini-digital-voltmeter.shtml
Monday, August 9, 2010
DIY: 40MHz Frequency Counter
This project describes how to make a small, cheap and simple frequency meter using Atmega16. It cane measure frequencies up to 40 Mhz with errors below 1%!

The display used is four common anode type 7-segment display. Since an ATMEGA16 microcontroller can source up to 40mA of current per I/O pin, no need of transistors for the 4 enable signals.
Source:http://www.ikalogic.com/freq_meter_2.php
Wednesday, August 4, 2010
ArduIMU Quadcopter: An Automatic Flying Machine
This tiny drone is packed with sonar and IR sensors and is ready for completely automatic flights. For outdoor flights, it can also hold positions based on GPS.

Tuesday, August 3, 2010
PIC12F683 Based Laser Projector
This Laser projector draws spirograph patterns on a screen. It uses two DC motors with tiny mirrors attached on them. The Laser beam is reflected from one mirror to another and then projected on a screen. With precise controll of DC motor spinning with a PIC12F683, various patterns can be displayed on the scree.
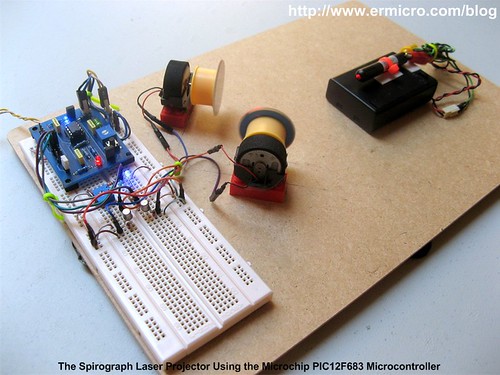
Since PIC12F683 has got just one hardware PWM, software PWM based on Timer0 is implemented here to control the speeds of DC motors.
Source: http://farm3.static.flickr.com/2274/4515039836_a548fbba2c.jpg
Since PIC12F683 has got just one hardware PWM, software PWM based on Timer0 is implemented here to control the speeds of DC motors.
Monday, August 2, 2010
Make Your Own USB Device using PIC18F4550
If you are looking to learn how to make your own USB device, this tutorial is perfect to start. Here you will see how to breadboard a simple USB generic HID device, creating the PIC18F firmware and finally creating the Windows interface for the device which will allow you to control a LED from the PC and read the state of a push-button from the device. Using the built in drivers for generic HID devices provides a simple method of creating Windows and Linux compatible devices and also makes the creation of both firmware and software far simpler. Since the HID standard does not require custom drivers you will not need to get a certificate for your driver, also both Windows and Linux have built-in libraries to help you communicate.

This project will allow you to control a LED from Windows and also see the status of a push-switch on the device. Using this the basic principals of 2-way USB communication will be made clear allowing you to progress onto more complex projects. The circuit is made on a breadboard and the PIC18F firmware will be based on (the freely available) MPLAB and Hitech C compiler, the Windows software will be created using Microsoft Visual C++ 2008 express (which is also free to download).
This project will allow you to control a LED from Windows and also see the status of a push-switch on the device. Using this the basic principals of 2-way USB communication will be made clear allowing you to progress onto more complex projects. The circuit is made on a breadboard and the PIC18F firmware will be based on (the freely available) MPLAB and Hitech C compiler, the Windows software will be created using Microsoft Visual C++ 2008 express (which is also free to download).
Subscribe to:
Posts (Atom)